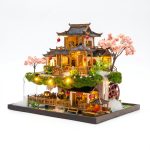



Miniature Hobbit House: How to Choose the Right Kit for Your Shelf
A miniature hobbit house is one of the more demanding kit builds you can put on a bookshelf. The curved door frame, the layered terrain that slopes into the roof, the round windows that need to sit flush against a wall that is not flat — every one of these details adds parts count, adds assembly time, and changes the way you approach the instructions. Before you compare kits or look at what is for sale, it helps to know what you are actually getting into.
This guide covers what sets hobbit house kits apart from other miniature house kits, how to read difficulty honestly, what to check on any listing before buying, where to display the finished piece, and what tools you need that will not be in the box.
What Makes a Miniature Hobbit House Different From Other Kit Builds
Standard cottage and house kits are built on rectangles. The walls meet at 90 degrees, the roof is two planes, the geometry is forgiving. A miniature hobbit house kit works differently. The signature round door requires curved basswood pieces cut to fit an arc, not a straight edge. The roof often integrates with a hillside or grassy mound, meaning the top of the build is not a peak but a rolling surface with overlapping layers of turf-textured material.
In our experience testing kits with organic geometry, curved pieces demand tighter tolerances. Laser-cut basswood at ±0.1mm precision means those arcs fit without gaps. If the listing does not specify a cutting method, you may be looking at die-cut parts with looser tolerances — and on a curved joint, that difference shows.
The category also splits into two display formats. A book nook insert fits between books on a shelf and creates depth viewed from the side — the round door appears at the edge of the shelf, leading into a scene behind the books. A tabletop diorama is freestanding, seen from the front. Same theme, different spatial logic. Book nook designs require compressing three-dimensional depth into a space defined by how far apart someone’s books happen to be. That constraint shapes every design decision, from how wide the door sits to how deep the scene can be.
If you want to see how hobbit and fantasy themes compare to other scene types, our miniature house design ideas across 20+ scene themes cover the range from cottage interiors to botanical greenhouses. You can also browse all miniature house kits to compare formats side by side.
Choosing by Skill Level: What Intermediate and Advanced Actually Mean
There are no true beginner hobbit house kits. The curved geometry itself is a step up from rectangular builds, even when the piece count is moderate. In our labeling system, a kit lands at Intermediate if it takes roughly 4 to 7 hours and has fewer than 200 pieces. Advanced means 8 to 15 hours and 200 or more pieces.
Declared assembly times on most kits assume ideal conditions — good lighting, no interruptions, a builder who has done this before. Based on the kits we have tested, add 30 to 40 percent to any published time for realistic planning. That means an Intermediate kit labeled at 5 hours will likely take you closer to 7. Plan for two sessions, not one. The second session is almost always better — the glue has set on the pieces you assembled first, you are not rushing, and you can focus on the detail work that makes the final result look right.
Piece count is the most reliable complexity indicator when evaluating a miniature hobbit house kit. Under 150 pieces is manageable for a first-time builder who reads the instructions carefully. At 250 pieces and above, you will encounter steps where the diagram alone is not enough — you need to understand what the piece is supposed to look like in three dimensions before you glue it.
We once let three people who had never built a miniature kit assemble the same model and recorded where they got stuck for more than ten minutes. It was the same two steps for all three: roof tile layering and threading the LED copper wire through the anchor holes. The instructions were not wrong — they were written for someone who already knew what the finished step was supposed to look like. For a hobbit house, those curved roof layers are exactly the kind of step where this happens.
If you are newer to kits, our beginner miniature house kit guide covers how to assess your skill level and choose a realistic first build.
Five Things to Check Before You Buy a Hobbit House Kit
When you find a miniature hobbit house for sale, the listing will show you a finished photograph. That photograph tells you almost nothing about the experience of building it. Here is what to look at instead.
1. Material. Basswood plywood is lighter, takes paint, and laser-cuts cleanly — the grain gives the finished piece a warm, natural surface. MDF board is a cheaper substitute: heavier, no visible grain, and less forgiving when the pieces are curved. On straight walls, MDF is acceptable. On a round door frame, the difference matters.
2. Precision. Laser-cut at ±0.1mm means joints fit together without forcing. If a listing says “wooden parts” but does not specify laser cutting, the tolerances are likely looser. On a build with curved geometry, tight tolerances are not a luxury — they are what keeps the pieces from gapping.
3. LED lighting. Every Nookcraft kit includes an LED string with wire and battery compartment. Many budget kits do not. Check the listing carefully. Also check whether batteries are included — they usually are not. CR2032 button cells are the most commonly forgotten purchase.
4. Instructions. Full-color English photo instructions with step-specific callouts are what separate a kit you finish from a kit you abandon at step 23. We have had buyers email to say their LED stopped working on day three. When we traced it back, glue had seeped into the copper wire joint during final assembly. That is why that step now has a warning box: keep glue away from wire ends. One email, one fix, still in the manual. Instructions that skip this kind of detail cost you time and parts.
5. Replacement parts policy. Missing or damaged pieces are common in kits with 200 or more parts. A 30-day return window and free replacement parts for missing or damaged pieces removes the risk of getting stuck on step 60 because a single piece is warped. Look for this in the listing before you buy.
You can browse miniature house kits for adults in our collection, where every kit lists material, piece count, difficulty level, and what is included in the box.
Display and Design Ideas: Where a Hobbit House Fits on Your Shelf
A miniature hobbit house sits naturally alongside fantasy and nature-genre books. Tolkien is the obvious match, but it also pairs well with Ursula Le Guin, Robin Hobb, and illustrated botanical references. The organic roof lines and earthy textures do not clash with nature scenes — they extend them.
A book nook insert and a tabletop diorama create different visual effects on a shelf. The book nook gives you a round door at the shelf edge, suggesting a world behind the books. The diorama sits in front of the books, fully visible. If you are building out a shelf with multiple scenes, pairing a hobbit house nook with a greenhouse or garden-scene nook on an adjacent shelf creates what I think of as a nature corridor — the themes do not match exactly, but the textures connect.
One detail worth knowing about the finished piece: LED-lit hobbit scenes read differently at night than during the day. Warm white light through a round door opening, casting a glow on the interior wall and the grass-textured roof — that is the detail most builders photograph first. I have sat at my work table with all other lights off, just the LED from a test build, and watched the tiny scene for longer than I would admit publicly. It is not a grand experience. It is a small, specific one — a door that glows, a world that fits between two books.
For nature-themed kits that work alongside fantasy scenes, see our guide to floral and greenhouse kits that pair well with fantasy shelf scenes.
Tools and Supplies You Will Need (Not Included in Most Kits)
Most miniature hobbit house kits are marketed as complete, but there are items you will need to source yourself. Knowing this before build day prevents the frustration of opening the box, reading step 1, and realizing you do not have glue.
- Super glue (cyanoacrylate). Almost never included. Fast-curing, strong bond on basswood. Have it ready before you open the kit. One note: keep glue away from the copper wire ends on the LED string. Contact between cyanoacrylate and copper wire causes intermittent LED failure — the light works, then flickers, then stops. This is the most common preventable issue we see.
- CR2032 button batteries. The most commonly forgotten item. The LED compartment in most kits takes one or two CR2032 cells. They are not expensive, but if you do not have them, you cannot test the light until they arrive.
- Tweezers and a craft knife. Not required — your fingers can do the work. But tweezers reduce the number of times you drop a piece that is 8mm wide onto the floor and spend five minutes looking for it. A craft knife helps with trimming flash from laser-cut edges.
- A flat, clear workspace with overhead lighting. This matters more than any tool. You need to see the grain direction on small basswood pieces, especially when the instruction says “this side faces out.” A cluttered desk and a desk lamp that casts shadows from your hands will slow you down more than any missing tool.
Frequently Asked Questions
How long does it take to build a miniature hobbit house kit?
Intermediate kits run 4 to 7 hours. Advanced kits run 8 to 15 hours. Add 30 to 40 percent to any time declared on the listing — those numbers assume ideal conditions. Best split across two sessions so the glue sets on early pieces and you are not rushing the detail work near the end.
What is the difference between a hobbit house book nook and a hobbit house diorama?
A book nook insert fits between books on a shelf and creates the illusion of depth when viewed from the side — the round door appears at the shelf edge. A diorama is a freestanding tabletop scene viewed from the front. Same theme, different display format and spatial logic.
Do I need crafting experience to build a miniature hobbit house?
No prior experience is required, but hobbit house kits are geometrically more complex than standard rectangular kits because of curved walls and layered roofs. An intermediate kit with full-color English instructions and a piece count under 200 is a realistic first build if you plan for two sessions and read ahead before gluing.
What glue should I use for miniature house kits?
Cyanoacrylate (super glue) for wood joints. It cures fast and bonds strong. It is not included in most kits. Keep it away from the LED wire joints — glue on copper wire causes intermittent failure. If you get glue on a wire end, the light may work at first and fail within days.
Ready to start building? Browse miniature house kits by difficulty and scene theme →