



Miniature Bookshop Kit: How to Choose the Right One for Your Shelf
You’re standing in front of your bookshelf. There’s a gap between two rows — maybe 4 inches wide, maybe 6 deep. You’ve been thinking about what to put there. A miniature bookshop kit is a DIY scene you assemble yourself, designed to fit that exact space and create the illusion of a tiny world behind your books. Choosing the right one comes down to four things: what it’s made of, how precise the cuts are, how long it actually takes, and whether the finished piece belongs on your shelf or just on a product photo.
What to Look for in a Miniature Bookshop Kit
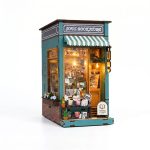
A miniature bookshop kit isn’t a display piece you unwrap. It’s a kit you build — laser-cut wooden parts, miniature furniture, LED lighting, and step-by-step instructions. The end result sits between your books, viewed from the side, and from a few feet away it reads as a window into a small lit world. The gap between the Hemingway and the Atwood becomes a bookshop with a reading chair and a lamp on.
What makes one kit worth building and another worth returning has less to do with the product photo and more to do with what happens at your kitchen table on a Saturday afternoon. In our experience, the kits that end up on shelves — finished, lit, and actually displayed — are the ones where the materials fit together the first time, the instructions answer questions before you ask them, and the difficulty rating tells you the truth.
Before you compare themes or prices, check these four criteria: material (basswood or MDF), laser-cut precision (±0.1mm is the standard you want), honest difficulty rating, and design depth — how much visual detail is packed into the scene. Everything else is secondary. For a full overview of how Book Nook inserts work and how to choose between different styles, see our Book Nook miniature kits guide.
Materials and Precision: Basswood vs. MDF and Why ±0.1mm Matters
The first question isn’t “what does it look like?” It’s “what is it made of?”
Laser-cut basswood plywood is the standard material for kits worth your time. Basswood is a light, fine-grained natural wood that takes paint cleanly and produces a warm finish. The grain is visible but not distracting. It weighs less than MDF, which matters when your finished piece needs to sit between books without pushing them sideways.
MDF (medium-density fiberboard) is the budget substitute. It’s heavier, the surface is uniform but flat — no grain, no warmth — and the edges tend to fuzz where the laser cuts through. Some kits use MDF and look fine in photos. On a bookshelf at arm’s length, the difference is noticeable.
Precision is the other number that matters. ±0.1mm tolerance means each part is cut within one-tenth of a millimeter of its intended size. What this means at your table: the joints fit. Pieces snap into place or press together with light finger pressure. When tolerance drifts to ±0.3mm or worse, you’re sanding edges, forcing joints, and covering gaps with glue. A kit miniature with tight tolerances assembles cleanly; one with loose tolerances becomes a repair project.
Piece count tells you how much is inside the box. A bookshop scene with 120–180 pieces is intermediate complexity — enough detail to feel rich, not so many that you lose track of where you are. Above 250 pieces, you’re in advanced territory. For a deeper breakdown of materials, tools, and what to expect as a first-time builder, our beginner miniature house kit guide covers the full setup.
| Material | Weight | Surface | Edge Quality |
|---|---|---|---|
| Basswood plywood | Light | Fine grain, warm tone | Clean, minimal fuzz |
| MDF board | Heavier | Flat, uniform | Can fuzz at cut edges |
Difficulty and Time: Honesty Over Hype
Here’s what most kit listings won’t tell you: the assembly time on the box is the fastest someone could finish if nothing went wrong. Based on builder feedback we’ve collected, real assembly time runs 30–40% longer than declared. A kit labeled “5 hours” takes closer to 7. A kit labeled “10 hours” takes two evenings.
We rate our kits at two levels: Intermediate (approximately 4–7 hours) and Advanced (approximately 8–15 hours). We don’t sell beginner-level kits at Nookcraft. Every miniature construction kit in our catalog requires patience, steady hands, and attention to the instruction photos. That’s not a warning — it’s a description of what the afternoon will look like.
The single most useful thing we’ve learned from testing: split the build into two sessions. We let three people who had never touched a miniature kit build the same model and tracked where they got stuck for more than ten minutes. All three hit the same walls — roof tile layering around steps 47–52, and threading LED copper wire through anchor holes at step 61. The instructions weren’t wrong. They were written for someone who already knew what the result should look like. After a break, with glue set and the first-session mistakes visible, the second session goes faster and with less frustration.
Every Nookcraft kit ships with full-color English photo instructions. Each step shows exactly where each piece goes, photographed from the angle you’ll be holding it. For kits that push into advanced territory — intricate diorama scenes, multi-level interiors — our miniature diorama kit guide walks through what to expect and how to plan your sessions.
Design and Integration: Making It Fit Your Shelf
A miniature bookshop diy model kit lives or dies by how it sits on your shelf. Not just physically — it needs to fit the books around it, in scale and in mood.
Scale is the first filter. Most Book Nook kits are built at 1:24 or 1:12 ratio. At 1:24, a six-foot doorway in the scene measures half an inch in the model. The scene reads as a distant world, atmospheric, something you look into. At 1:12, details are larger — a tiny book has visible spine text, a chair has a real seat. The scene feels closer, more present. Neither is better. The question is what you want to see when you glance at that shelf from across the room.
Theme is the second filter. A cozy bookshop with a reading nook and warm lighting tells one story. A fantasy library with arched doorways tells another. A vintage secondhand store with stacks of books on the floor tells a third. The miniature bookshop kit category leans toward warmth — small counters, hanging lamps, shelves lined with painted spines — but the specifics vary enough that you should choose based on what makes you pause on the product page, not what the algorithm suggests.
Every Nookcraft kit includes an LED string — warm-white, battery-operated, with wire thin enough to thread through the scene without visible bulk. There’s a specific quality to a miniature scene with the LED on and all other lights off. The light makes the depth real. The shadows inside the doorway make it feel like you could step through. I sit with finished test samples like that sometimes — just the LED, just the scene, for a few quiet minutes.
If a bookshop isn’t quite right for your shelf, miniature greenhouse and floral kits offer a different register — glass roofs, trailing plants, natural light rendered in wood and paint.
Recommendations: Matching a Kit to Your Situation
Rather than a generic “top 10” list, here’s how to match a kit to where you actually are:
| Your situation | Look for | Piece count | Time | Difficulty |
|---|---|---|---|---|
| First miniature kit ever | Clear instructions, single-room scene, moderate detail | 120–180 | 4–7 hrs | Intermediate |
| You’ve built one or two kits before | Multi-level design, more furniture, finer details | 180–280 | 7–12 hrs | Intermediate–Advanced |
| Experienced crafter wanting a challenge | Complex diorama layout, intricate wall treatments, layered lighting | 280+ | 10–15 hrs | Advanced |
What all our kits share: laser-cut basswood at ±0.1mm, full-color English photo instructions, and an LED string in every box. Our instructions start at step 3 — the first two steps are preparation, and they’re the two steps nobody ever includes. That decision added two weeks to our first draft. Most instruction manuals start at step 1 and assume you’ve already cleared your workspace and scanned the manual. We don’t assume that.
To browse our full range and find the right fit, see Book Nook kits by difficulty level.
Getting Started: Tools, Tips, and Avoiding Pitfalls
A miniature paint kit or construction kit doesn’t include everything you’ll need. Here’s what to have on your table before you open the box:
- Super glue (cyanoacrylate) — fast-curing, strong bond on wood. Not included in kits. Buy a small tube with a precision tip.
- Scissors or craft knife — for trimming any small tabs or excess material from laser-cut parts.
- Tweezers — optional but useful for placing tiny pieces, especially furniture legs and book spines.
- Small paint set — optional. Basswood takes acrylic paint well if you want to customize colors.
The most common mistake we see in builder feedback: glue seeping into the LED wire joint during final assembly. At step 29 in our kits, there’s a warning box: keep glue away from wire ends — contact causes intermittent failure. One buyer emailed us on day three when her LED stopped working. She’d followed every step. The issue was glue at the joint. That warning box is there because of her email. It’s still in every manual.
Workspace setup: flat surface, good overhead light, and enough room to spread out the instruction sheet alongside the parts tray. A cluttered table means lost pieces. A wobbly table means frustration. If you need a full tools-and-setup walkthrough, the beginner starter guide has the complete list with explanations.
30-day returns, free replacement parts for missing or damaged pieces. If something isn’t in the box or arrives broken, we send the part. No photos required, no hoops.
Frequently Asked Questions
Do I need crafting experience to build a miniature bookshop kit?
No prior experience is required, but the kits are designed for adults who are comfortable following detailed multi-step instructions. Our Intermediate-rated kits (4–7 hours) are the starting point — we don’t sell beginner-level kits. If you can follow a recipe with more than ten steps and you’re patient with small parts, you can build one. The full-color English photo instructions show each step from the angle you’ll be working at.
What tools do I need that aren’t included in the kit?
You’ll need super glue (cyanoacrylate with a precision tip), scissors or a craft knife, and optionally tweezers and acrylic paint. Every kit includes the laser-cut wooden parts, furniture components, LED string, battery compartment, and printed instructions. Batteries (typically CR2032 button cells) and glue are not included. We don’t include glue because it dries out in sealed packaging, and most crafters have a preference for their own adhesive.
How do I maintain and display the finished kit?
The finished piece sits between books on a standard bookshelf. For long-term display, a dust cover or transparent display case protects the scene from dust accumulation and accidental bumps. Dust covers are sold separately. Place the kit where the LED can be appreciated — a shelf at eye level, ideally against a wall that won’t reflect the light back harshly. If the LED string needs battery replacement, the compartment is accessible from the back of the kit without disassembling the scene.
Ready to start building your bookshelf world? Browse miniature bookshop kits that match your skill level →